
If you are looking for some interesting winter craft ideas for young kids, then you’re in the right place! Here, we have put together some cool and classic fun winter crafts for preschoolers, and winter crafts for toddlers. All you have to do is get the art and craft supplies that are needed and entice the little munchkins to create something on their own by following the instructions given. You can also lend a helping hand and make it an interactive DIY session!
Simple Winter Crafts for Toddlers
Scroll down to get some exclusive winter art ideas for toddlers!
1. Snowy Winter Tree With a Bubble Wrap
This super simple and fun craft idea is perfect for toddlers. Most kids are always excited about the snow, so just go for it!
What You Will Need
- Black colour paint
- White colour paint
- Bubble wrap
- Paintbrush
- Scissors
- A sheet of blue card
Instructions
- Begin by drawing a tree trunk with many branches using the black paint. Depending on the age of your kids, you may also help them draw the tree.
- Next, use the white colour and paint the paint a circle on the bubble wrap (an excellent exercise to sharpen their fine motor skills).
- Now, place the painted side of the bubble wrap onto the branches of the tree and press down firmly.
- Remove the bubble wrap to see the snow!
- Repeat the process to cover all the branches until they are randomly covered in snow. Your simple snow art project is complete.
2. Cute Paper Polar Bear
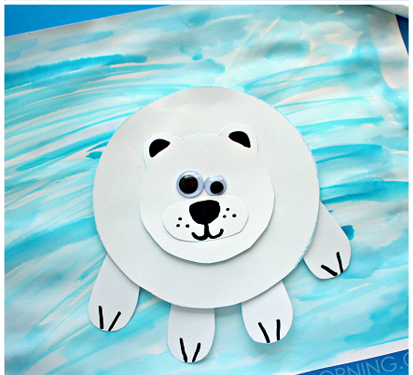
Source: Pinterest
An excellent winter craft for toddlers, this one looks cute, funny, and interesting! You will need to help your little ones a bit in this, especially with the scissors, so it will be a fun activity for both of you!
What You Will Need
- Watercolours
- Black marker pens
- Glue
- Googly eyes
- Scissors
- 2 pieces of white chart paper
Instructions
- To begin with, start by painting the chart paper with the white colour paint. You can add a tint of blue to it to make it look like natural ice. Once done, wait for it to dry.
- Next, cut out the parts and features of the polar bear – body, legs, nose and face.
- For a perfectly circular face, you can use a round object to trace, but don’t forget to add the ears!
- Use the black marker pen to highlight the legs, face, nose, and ears.
- Now glue all the pieces accordingly and finally stick the google eyes. The polar bear is ready.
3. Snowy Cotton Ball Snowman
A cute winter-themed cotton ball snowman will lift your kids’ holiday spirits! This super simple cotton ball snowman can be made quickly and is relatively inexpensive too.
What You Will Need
- Plain white cotton balls
- Scissors
- Glue
- Black and chart paper
- Colour printer (Optional)
- 2 white chart papers
- Watercolours
- Glitters
- Pencil
Instructions
- If you have a printer, then use the white chart paper and print a beautiful background for your snowman.
- In case you don’t have a printer, then skip the first step and use the watercolours to paint a colourful background for your snowman. Top it up with some glitter, and let it dry.
- Now, roughly draw the snowman on the white chart paper using a pencil.
- You’re ready to start building the snowman. Put some glue on the snowman drawing and get your children to place the cotton balls on the top of the glue until the snowman is completely filled with white cotton balls.
- While your kids are busy doing this, you can cut out other features of the snowman like a hat, nose, eyes, and buttons from the black chart paper.
- To complete the craft, stick the cut outs onto the snowman, and we’re good to go!
- You can increase the embellishments as per your desire and kids’ interest!
4. Penguin Cards Using Finger Prints
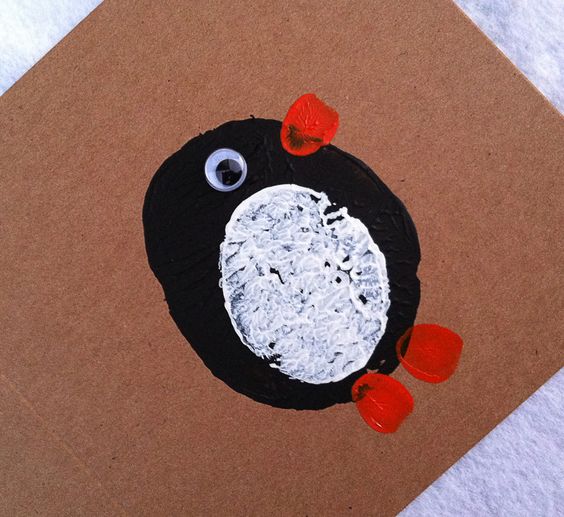
Source: Pinterest
Cute and adorable, these fingerprint penguin cards would serve as the perfect thank you cards for this holiday season! Don’t worry about the mess your little one is about to make while dipping his fingers in paint; it would be worth the effort.
What You Will Need
- Black colour paint
- White colour paint
- Yellow colour paint
- Little fingers
- A small brush
- Paper
- Scissors
- Black coloured greeting card paper
Instructions
- Get your kids to do a lot of thumbprints on the paper using black colour paint. Don’t worry if it’s not perfect after a few attempts; they’ll get it correct. Let it dry once done.
- Once the paint is dry, make small tummies using the white colour paint either with the small brush or with your kids’ fingers.
- Now, use the yellow colour paint to make two feet and a beak using the brush.
- Finally, make the eyes using white paint.
- Once the paint is completely dry, cut out the penguin using the scissors and glue it on the black card paper.
- Write a warm, heartfelt thank you message inside the card, and your cute little DIY thank you cards are ready!
5. Winter Hat Wall Hanging
This is one of the cutest and most adorable winter craft ideas for kids. This winter hat craft idea is perfect for toddlers to help enhance their creativity and sharpen their fine motor skills. It’s easy, fun, and quick to make!
What You Will Need
- White card paper
- Cotton balls
- Colours crayons
- School glue
- Scissors
- Glitter (optional)
- Pencil
- Eraser
- String
Instructions
- Begin by drawing many winter hats on the white card paper. Either you can draw it for them or let the kids draw as it’s super easy to make them.
- Next, let the kids use the crayons to colour the hat randomly. Crayons give a nice texture to the drawing, and also, reduce the mess.
- Once the kids have coloured the hats, you can cut them out using a scissor.
- Now, add glue on the top and bottom part of the hat and let the kids affix the cotton balls onto the glue. This step is the real fun part of the deal!
- It will make the winter hats look popped up a bit.
- If you want, you may add some glitter randomly on the cotton balls for that extra special effect!
- They look super cute as it is but for the best look hang them on a string using the glue and they’re ready!
Easy Winter Crafts for Preschoolers and Kids
Read on to find out some exciting winter craft ideas for preschoolers and kids!
1. Popsicle Button Snow Flakes
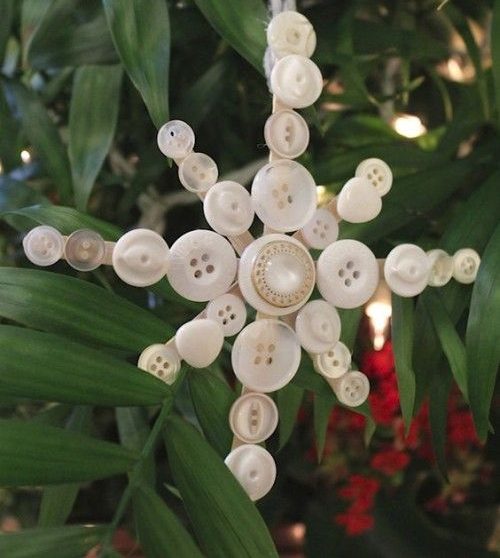
Source: Pinterest
These lovely little button snowflake popsicles are simply adorable! It’s fun and easy to make, and perfect for preschoolers and younger kids.
What You Will Need
- 3 popsicles sticks
- Hot glue gun
- White colour paint
- Paintbrush
- Glue
- Ribbon for hanging
- An assortment of buttons in light pastel shades or white
Instructions
- Firstly, glue the popsicles one over the other in the shape of a star using the hot glue gun. Let it dry.
- Next, you can ask the kids to paint these popsicles white using a brush. Paint on the first side, let it dry and then paint on the other side.
- Once the paint is dry, apply glue on the popsicles and let the kids affix the buttons one by one.
- Glue some colourful ribbons on to the popsicles to hang them wherever you want. You can also write your kids name and the dates on the back.
2. Snowflake Using Tissue Paper and Twig
Snowflakes are a must-have ornament during the winter holiday season! This is a special snowflake that’s super fun, and easy to make using real twigs and tissue papers.
What You Will Need
- Sticks or twigs (You can collect them randomly from nearby trees, or use natural bamboo sticks).
- Hot gun glue
- White or Silver acrylic paint or tempera paint
- Paintbrush
- White, grey, or light pink coloured tissue paper
- Liquid glue
- Scissors
- Yarn or string
Instructions
- Take three twigs or sticks of the same length and thickness. If you don’t have it in the same length, then you can cut them into equal sizes using a knife. Glue them together in the shape of a snowflake using a hot gun glue.
- Since this project gets a little messy with the glue, you can cover your workstation using an old cloth or newspaper.
- Let the kids paint the snowflakes using white acrylic paint or tempera paint and leave it to dry.
- While this is drying, ask your kids to crumple up the tissue paper and make small balls out of it. Each ball should look like a tiny flower.
- Next, apply glue on the twig using a brush and let the kids stick on the crumpled tissues on the snowflake.
- Once it’s completely covered, set it aside to dry.
- After they dry, use yarn to hang them as a festive season ornament!
3. 3D Polar Bear Winter Craft Idea
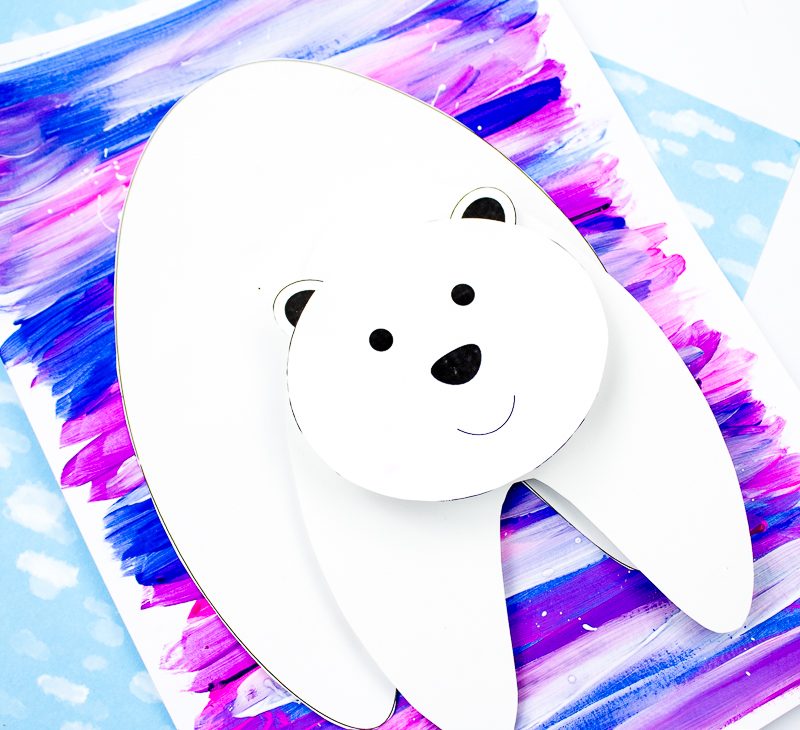
Source: Pinterest
This one is perfect for parents looking for some exciting winter animal crafts for their young preschoolers. A 3D polar bear that wobbles and pops out from the page! Sounds interesting, right? Then, do give it a try.
What You Will Need
- White paper
- Paint
- Glue stick
- Paintbrush
- Scissors
- 2 white card papers
- Black marker
Instructions
- Take the white paper and create a colourful arctic background with the help of bright coloured paints like pink, blue, purple, etc. This can be done using chalk colours or crayons as well depending on what your little one is comfortable with.
- To create an effect, you can add layers of white paint in between the dark colours to blend them all together. Leave it to dry.
- On the white card, draw the face, eyes, and two body elements of the polar bear using the black marker.
- Now cut out all the parts of the polar bear using a scissor.
- Next, affix the cut out of one body element on the arctic background.
- Cut a strip of another white paper and cut it into half.
- Fold the strip into half and stick the two ends together to form a tube-like structure. Now, stick this tube onto the middle of the polar bear body.
- Use a second strip to create another tube and affix it on the leg of the polar bear. Now, affix the second body element on top of the tube.
- Repeat the above process and create another tube for the face and finally affix the face on top of the last tube. Finish it by sticking the eyes and the craft is done!
4. Creative Winter Woodland Trees
This creative winter woodland tree is magical and an excellent exercise to inspire your kids’ imagination.
What You Will Need
- Paper tubes or toilet rolls
- Paint
- Paintbrush
- Scissors
- White card paper
Instructions
- Cut out small triangle cards in the shape of a tree from the white card paper.
- Now, let the kids paint these trees with beautiful bright colours of their choice.
- Next, paint the paper rolls in brown colour.
- Cut the paper tubes into several smaller segments and then cut two small slits on both the opposite sides of each tube.
- Now, place the triangle trees in between the slits on top of the paper tubes. Your winter craft is ready!
5. Winter Snowman Peg Ornament
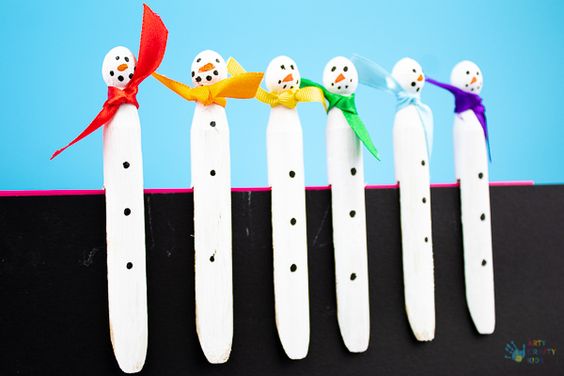
Source: Pinterest
This simple and easy snowman peg ornament is perfect for decorating the Christmas tree!
What You Will Need
- Acrylic colours – white, black and orange
- Ribbon
- Paintbrush
- Highball glass
- Wooden pegs
Instructions
- Take the pegs and position them on the highball glass.
- Paint the pegs using white acrylic colour.
- Use a fine paintbrush to make three black dots for the buttons on the peg. Next, paint the eyes, and mouth of the snowman using black colour.
- Finish the face with a cute orange nose.
- Once it is dry, tie a ribbon around the neck and a piece of twine on the back of the ribbon to hang it on the Christmas tree!
6. Winter Polar Bear
This cute polar bear artwork enhances fine motor skills of both kids and adults!
What You Will Need
- Tissue paper in different colours
- Glue
- White card paper
- Black chart paper
- Scissors
Instructions
- Download the template of a polar bear online or cut out the shape of a polar bear from the black chart paper.
- Cut the tissue papers into squares, triangles or random shapes, and keep them ready.
- Now, apply the glue on the white card paper and let the kids start affixing the cut tissue paper in layers until the entire surface is covered. Let them use their imaginations to develop a pattern.
- Next, stick the polar bear onto the tissue paper background using the glue. The winter polar bear is ready to play.
7. No-Sew Sock Penguin Craft
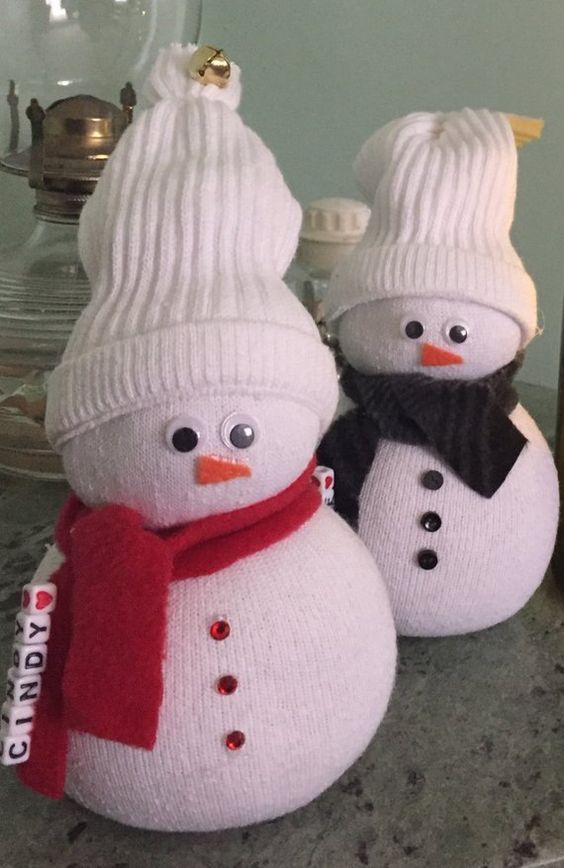
Source: Pinterest
This is probably one of the cutest DIYs that you can make with your kids.
What You Will Need
- 1 black sock
- 1 coloured sock for the hat
- Glue gun
- PVC glue
- Rice
- Rubber band or thread
- Ribbons
- Scissors
- Marker or paint
- White and orange coloured felt
Instructions
- Begin by filling the black sock with rice till the sock gets a nice round shape of a penguin. Tie the top with two rubber bands to keep the shape fixed.
- Next, tie another rubber band in the middle of the sock to separate the face and body of the penguin.
- Cut the extra part of the sock from the top.
- Cut out a white oval shape from the felt and secure it on the top of the penguin using a glue.
- Cut out a small beak from the orange felt and glue it on the face.
- Draw two black eyes on the face using the black marker and lastly tie the ribbon around the neck to make a scarf.
- Finally, cut the colourful sock from the middle, and roll it up to make the shape of a hat. Place it on top of the penguin.
8. Pine Cone Bird Feeder
Kids just love birdies! How about making a cute pine cone bird feeder for those little friends?
What You Will Need
- Pinecones
- Strings
- Birdfeed
- Peanut butter
Instructions
- Tie the string onto the bird feeder.
- Let the kids spread the peanut butter on the pine cones using a blunt knife. You have to ensure that it’s nice and compact.
- Put the birdfeed on a plate, and roll the peanut butter coated pine cones in the plate. Your cute pinecone bird feeders are ready to be hanged in the balcony!
9. Winter Tree Painting Art
Simple, cute, and fun, this winter tree painting is perfect for young kids for a cosy winter day!
What You Will Need
- White paper
- Paint
- Masking tape
- Paintbrush
Instructions
- With the help of the masking tape make the shape of a tree on the paper. You can do this step for your kids.
- Now, let the kids start painting the paper and have fun. It will be a little messy, so you can cover the work station with an old newspaper.
- Let the painting dry.
- Once the painting is completely dry, remove the masking tape, and your winter tree is ready!
10. Snowy Owls With Pine Cones
These cute pinecone owls are easy to make, and would be a fun activity for kids! It can be used as an adorable Christmas tree ornament.
What You Will Need
- Pinecone
- Googly eyes
- Cotton wool
- Felt in different colours
- Glue
Instructions
- Begin by tearing the cotton wool apart into small pieces and stuff them into the pine cones. Glue is not required in this part, and the kids can easily stuff the cotton balls into the pine cones.
- Once the wool is completely stuffed, make sure that no loose ends are hanging out, and the entire pinecone is sufficiently stuffed.
- Cut out small circles and triangles in different colours from the felt.
- Use glue to affix these circles and triangles onto the cotton stuffed pine cones.
- Use orange felt for a triangular nose and two circles felt for the eyes.
- Once all the felt has been glued, finish it by affixing the googly eyes on the circle-shaped felt for eyes.
- Your pinecone owls are ready to be flaunted!
These small activities are fun and easy as well as ensure some bonding time between kids and parents. It is also an interesting way to enhance your kids’ creativity. We hope that you have loads of fun while working out on the list of DIYs with your kids!


